Not so long ago, I realised that while I do a lot of cooking, I don't have a very big range. Mainly I cook the same kind of pseudo-italian pasta-sauce-like things over and over in slightly varying degrees, with the occasional fusion-thai-style dinner for variety.
To kick that, and push my boundaries a little, I've been pushing my cooking comfort-zone. Partly with new mundane things (eg bread), but also with the occasional medieval dish - because why not?
Makshufa - what is it?

This dish is a medieval sweet-meat - an almond Halva, made from the Medieval Arab Cookery book (here pictured). This book combines a number of period arab cookery books and contains heaps of fantastic and tasty recipes - and I plan to cook a whole bunch of them in time.
The recipe is:
MAKSHUFA. Take equal parts of sugar, almonds (or pistachios), honey, and sesame-oil. Grind the sugar and almonds, and mix together. Add saffron to colour, mixed with rose-water. Put the sesame-oil into a basin, and boil until fragrant: then drop in the honey, and stir until the scum appears. Add the sugar and almonds, stirring all the time over a slow fire until almost set: then remove.
What I did

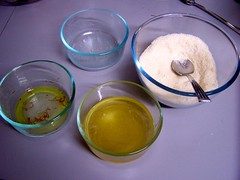
Ingredients:
- sugar
- almond meal
- sesame oil
- honey
- saffron
- rose water
You will need equal amounts of the first four ingredients - to make a small "loaf" of halva (see pictures below).
Equipment:
You will also need a heavy-bottomed-pot preferably a much bigger one than you'd need to fit the ingredients, as it will bubble and froth like crazy.
You will also need something onto which to pour the hot halva. I find that a lightly-oiled lamington tin is perfect.
I'd also recommend setting aside a couple of saucers for testing "done-ness" of the halva-mix during the toffee-making phase.
A big, heavy knife and a cutting-board are also good for cutting it into pieces. Do this if you think your halva will be fairly solid, as cutting it while it's still warm is much easier than when its gone solid.
Step 1: start the saffron

Before
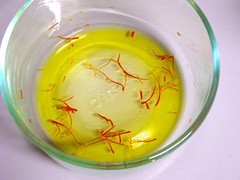
After
Saffron takes a little while to steep, allowing the colour to come out so I'll generally start it early. The recipe just calls for it to be added... but I'm quite certain that the cooks of the period would have realised that it was the steeped saffron, rather than the strands alone, that is to be added.
To prepare, put a very small amount of warm water into a bowl, and add a pinch of saffron. I also add the rose-water (just a half a teaspoon full) so there's a little more liquid without there being too much plain water.
Then leave it to one side while you do all the next steps - but don't forget about it!
Step 2: prepare your equipment
Getting your equipment ready early means you're prepared to quickly move to the next stage no matter what happens, and I find that in this recipe, things move quickly! So I prefer to have mine prepped and ready to go from the beginning.
In this case, you need your big pot on the stove, and your lamington tin very lightly oiled (a teaspoon smeared out to the edges works for me). Put the lamington tin in easy reach onto a heat-proof mat or trivet.
I'd also put two saucers into the fridge (for testing done-ness). Being cold makes it much quicker to test whether the hot toffee-like stuff is ready.
Put a knife and cutting board to one side for cutting it up while still warm.
Step 3: prepare the main ingredients
The recipe calls for pounding the almonds and sugar - but I cheated and just bought almond meal and table sugar. You can grind your own if you like - fresh-ground almond meal does have a much better flavour... but there's also something to be said for convenience. So at this stage, all I did was mix them together.
Meanwhile, in a pot I began to warm the sesame-oil. Once it's warm it will indeed begin to smell wonderfully fragrant - at this point you can pour in the honey. It's unlikely that modern honey will have very much scum - as mostly modern honey is filtered for all the bee-parts, pollen and wax. You will get a small amount of scum, which is the proteins of the honey. It's up to you whether or not you want so skim it off - it's in no way bad for you, and this recipe doesn't require crystal-clear clarity, so I'd just mix it back in.
Don't let it get too hot - leave it on a low simmer.
Step 4: Add the ingredients to the pot

When your oil and honey is nicely warmed and starting to simmer, it's ready for you to add your other ingredients. Don't let it be too hot, because it will burn the almond-meal. Just a light simmer will do.
Please be very careful when adding the other ingredients - they will cause the very hot, very sticky mixture to bubble and froth!
Add the almond meal/sugar mix, and the saffron/rose-water too; stirring quickly to get it mixed in well and not all lumpy.
Step 5: "stir it over the fire until almost set"

The next stage is to just let it simmer on low, letting the sugars caramelise. Determining how long this should be is a black art, with the answer being "until it's ready".
You can tell it's ready if you drop a half-teaspoon-ful onto a *cold* saucer (from the fridge). If you tip the plate and it runs across the plate - it's nowhere near done. If it doesn't move at all it's done! take it off the heat! If it kind of gloobs over to one side, carefully push at it with a fingernail or spoon - it should feel like treacle - at which point, take the pot off the heat and go to the next stage.
Step 6: pour it forth
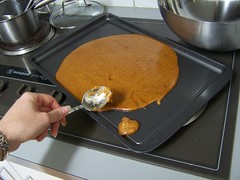
Pour it out onto the lamington tin. Now and then, push at it with a spoon. You'll want it to be not too hot to manipulate, but you want to get to it before it goes too solid to play with.
The runniness can be deceiving... the picture at right is when it's just been poured out and it still too runny to move - it looked to me like it'd be way too soggy to cut, but this halva actually went nearly rock-hard when cool.
Step 7: roll and cut

Roll it up
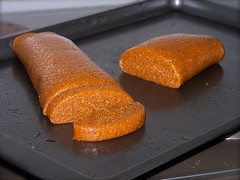
and cut.
Roll it up, then cut it into bite-sized chunks and serve it forth. Enjoy.
I recommend keeping it in an air-tight container to maintain the texture.
No comments:
Post a Comment